Month: October 2023

What safety measures should be taken when working with pipe fitting elbows, particularly in high-pressure or critical applications?

Working with pipe fitting elbows, especially in high-pressure or critical applications, demands strict adherence to safety measures to prevent accidents, system failures, and ensure the well-being of workers. Here are important safety measures to consider:

  1. Personal Protective Equipment (PPE): Ensure that all personnel involved in the installation and maintenance of pipe fitting elbows wear appropriate PPE, including safety glasses, gloves, and protective clothing to safeguard against potential hazards such as sharp edges, hot surfaces, and chemicals.
  2. Pressure Ratings: Use pipe fitting elbows with pressure ratings that match the requirements of the specific application. Using fittings with lower pressure ratings in high-pressure systems can result in catastrophic failures. Check that the fittings are properly marked with their pressure ratings.
  3. Material Compatibility: Verify that the materials of the pipe fitting elbows are compatible with the fluids or gases being transported. Chemical compatibility is crucial to prevent corrosion, degradation, or contamination.
  4. Leak Detection: After installing or making modifications, conduct leak detection tests to check for any potential leaks. Look for bubbles forming at threaded connections, which indicate a leak. Address any leaks promptly.
  5. Proper Installation: Ensure that the fittings are correctly installed. Over-tightening can damage the threads, while under-tightening can result in leaks. Follow manufacturer guidelines for torque specifications and use thread sealants where necessary.
  6. Hydraulic Testing: In high-pressure applications, consider conducting a hydraulic test on the system to ensure that it can withstand the specified pressure without issues. Follow safety protocols during testing, and have a clear plan in case of system failure.
  7. Regular Inspection: Periodically inspect the system for signs of wear, corrosion, or damage. Address any issues promptly to prevent system failures.
  8. Emergency Response: Establish and communicate emergency response procedures for potential incidents, such as leaks or sudden pressure releases. Ensure that all workers are familiar with these procedures and that emergency equipment, such as eyewash stations and safety showers, are accessible.
  9. Isolation and Lockout/Tagout: Before working on the system, isolate it from other equipment and perform lockout/tagout procedures to ensure that no unexpected pressure or fluid release occurs during maintenance.
  10. Safety Regulations: Comply with industry and local safety regulations, as well as any specific requirements for the application. Follow established safety standards to ensure the protection of both personnel and the system.
  11. Qualified Personnel: In high-pressure or critical applications, consider using qualified and experienced personnel who are trained to work with such systems. Proper training and expertise are essential to avoid accidents.
  12. Documentation: Maintain detailed records of the installation, maintenance, and testing of pipe fitting elbows, as well as any modifications made to the system.

It is important to note that safety measures may vary based on the specific application, the type of fluid or gas being transported, and the pressure levels involved. pipe fittings elbow Always consult industry standards, safety guidelines, and the manufacturer’s recommendations when working with pipe fitting elbows in high-pressure or critical applications.

What is a pipe fitting elbow, and how does it function in plumbing and piping systems?

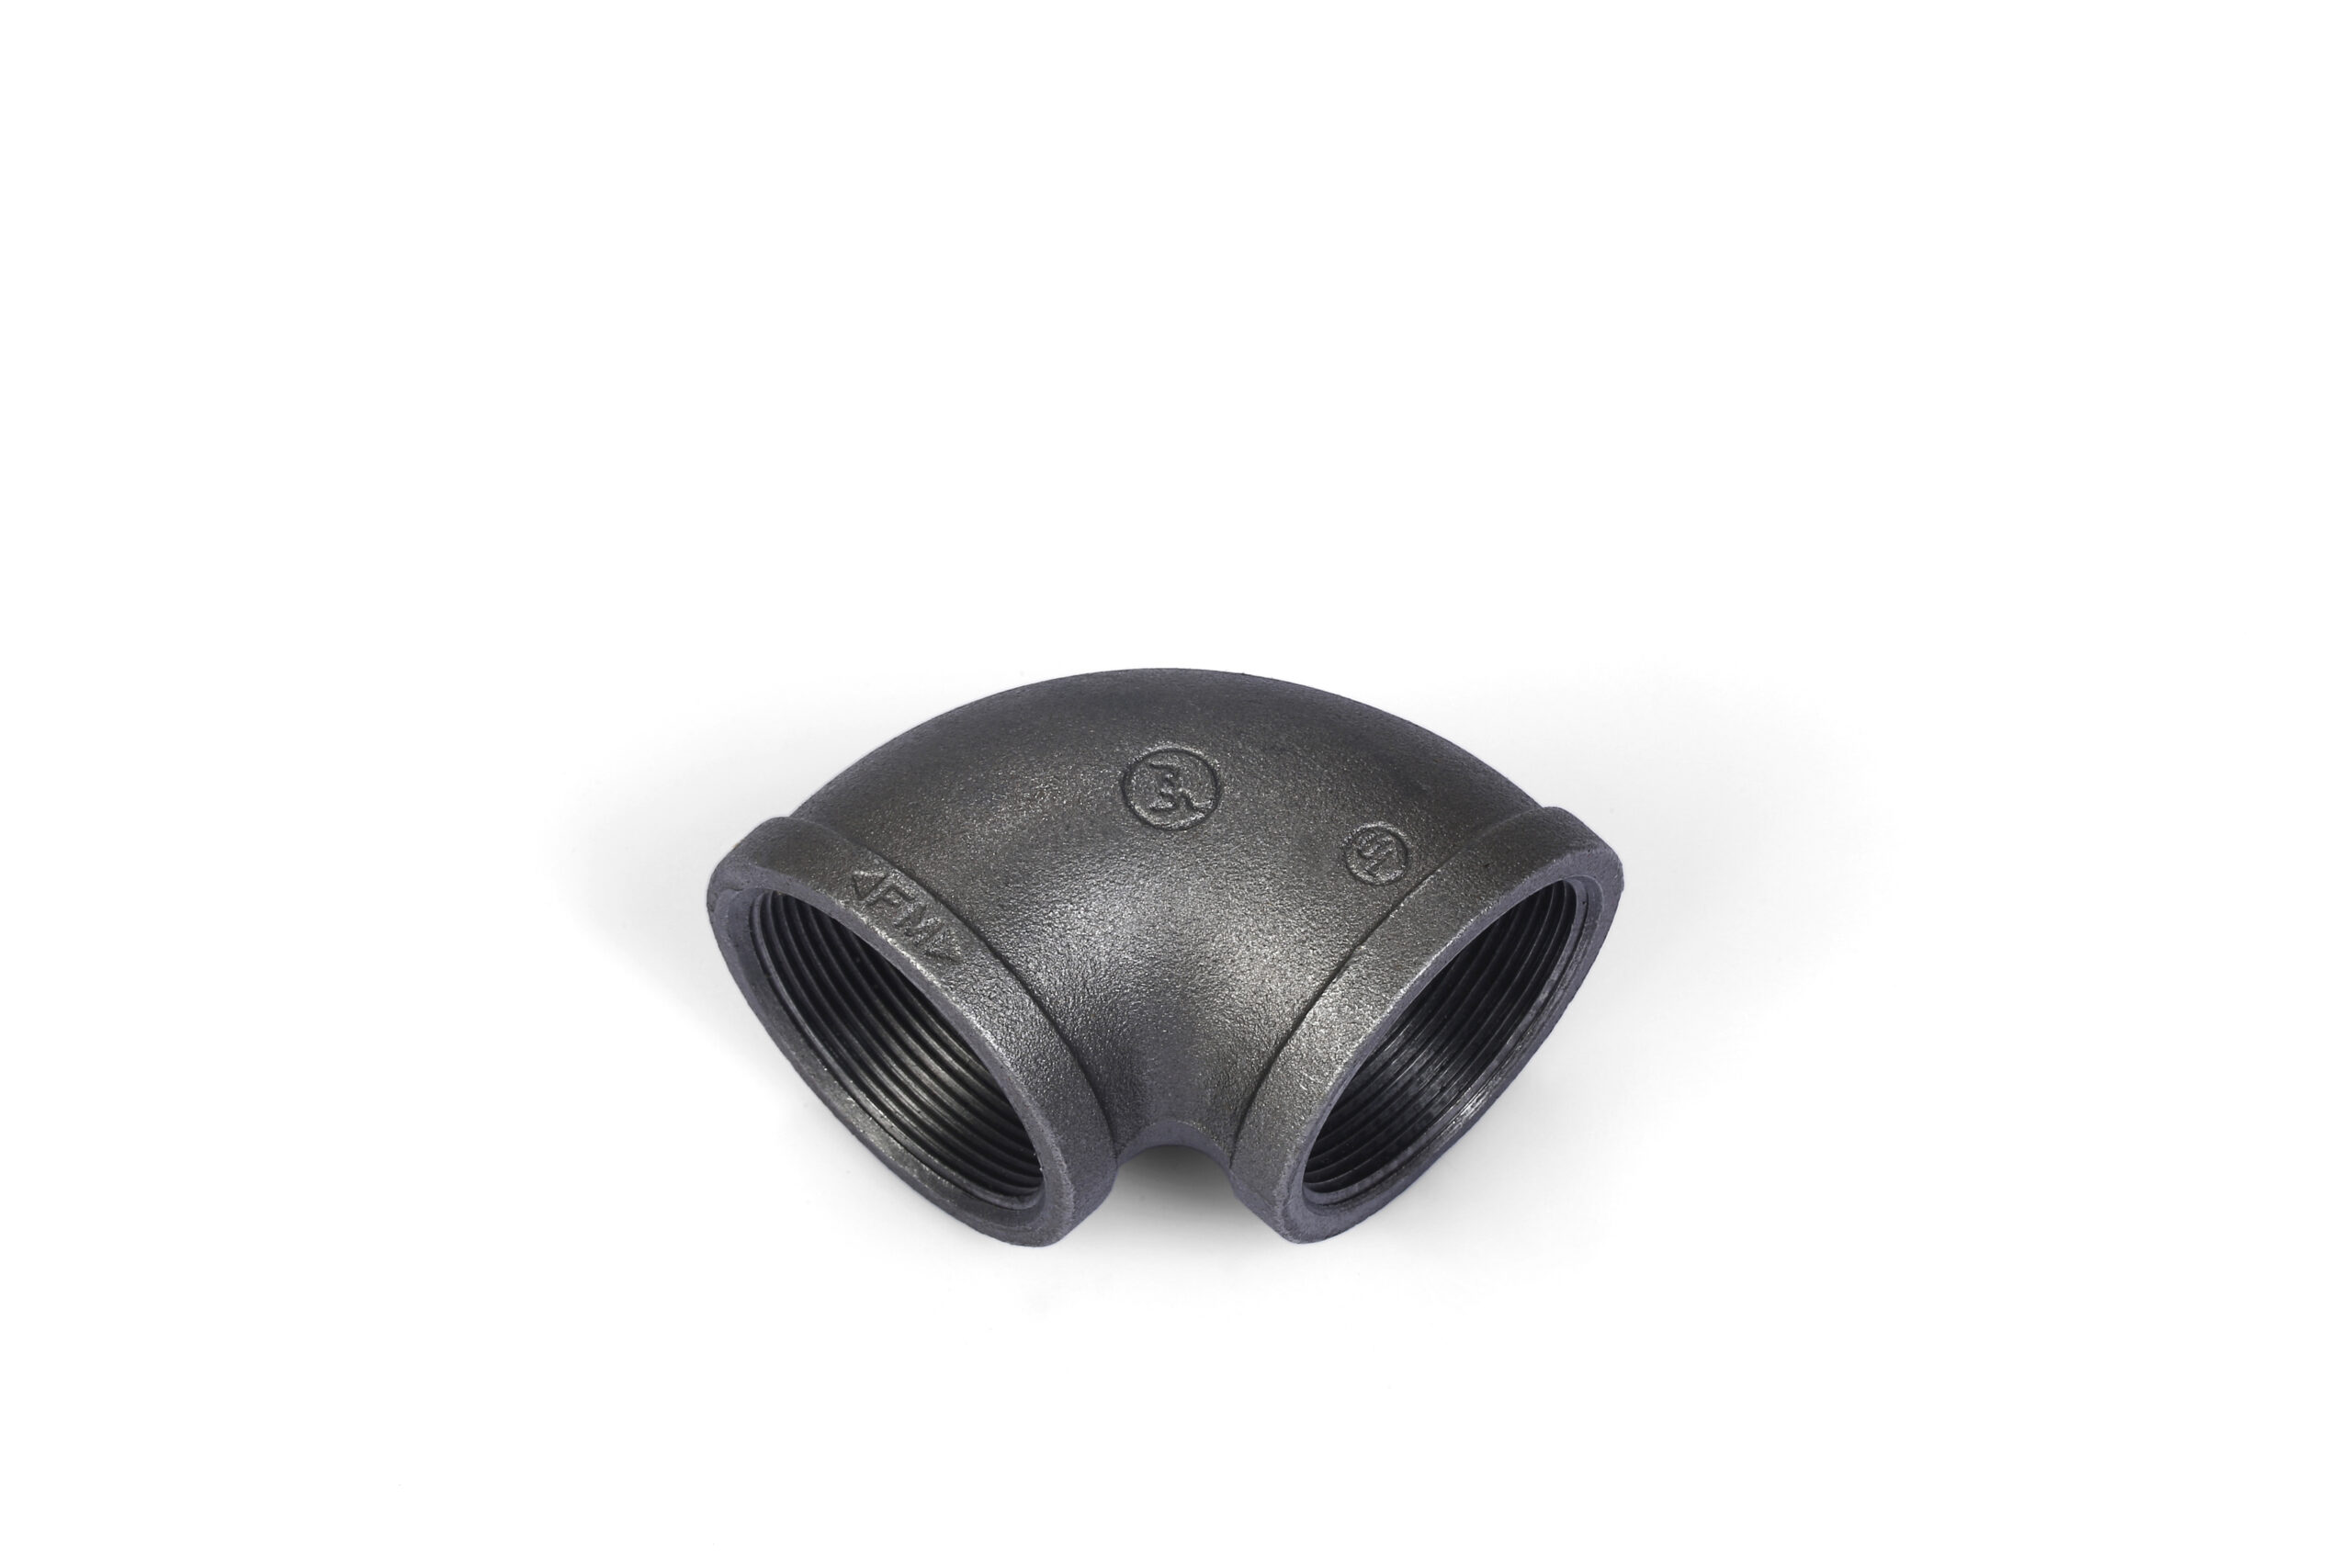
A pipe fitting elbow is a crucial plumbing component designed to facilitate changes in the direction of fluid or gas flow within a piping system. It functions by creating a bend or curve in the pipeline, redirecting the flow along a new path. Here’s a detailed explanation of what a pipe fitting elbow is and how it functions in plumbing and piping systems:

Pipe Fitting Elbow:

  • A pipe fitting elbow is a curved or bent pipe component with two female threads, one male and one female thread, or a combination of threads and plain ends. It is used to connect two sections of pipe while altering the direction of the pipeline, typically at a 90-degree or 45-degree angle. Elbows are available in various materials, including steel, copper, PVC, and more, to suit different applications.

Function in Plumbing and Piping Systems:

  • The primary function of a pipe fitting elbow is to change the direction of fluid or gas flow within a plumbing or piping system. It allows pipes to navigate around obstacles, fit into confined spaces, and create specific layouts in the system.
  • In plumbing systems, pipe fitting elbows are commonly used to reroute water, gas, or other fluids, enabling pipes to go through walls, floors, or ceilings while maintaining a consistent flow of materials.
  • These elbows are vital in industrial settings to direct the flow of chemicals, gases, or liquids to various processing equipment, ensuring efficient transport within a facility.
  • Pipe fitting elbows can be threaded onto the ends of pipes, creating a secure and leak-resistant connection. Properly installed elbows ensure the integrity of the system, maintaining fluid or gas flow without obstructions or interruptions.
  • The choice of a 90-degree or 45-degree elbow depends on the degree of change required in the direction of the pipeline. A 90-degree elbow creates a right angle turn, while a 45-degree elbow introduces a more gradual change in direction.
  • Additionally, pipe fitting elbows are instrumental in designing and configuring piping systems, allowing for optimized layouts and space utilization in plumbing, HVAC, and industrial applications.

In summary, a pipe fitting elbow is a plumbing component that changes the direction of fluid or gas flow by creating a bend or curve in the pipeline. Its function is essential for navigating complex layouts, reaching different levels of structures, and ensuring efficient transport of materials within plumbing, HVAC, and industrial systems. Properly installed pipe fitting elbows are crucial for maintaining system integrity and ensuring the efficient distribution of materials.

What are the maintenance requirements for cast iron air valves?

Maintenance requirements for cast iron air valves can vary depending on the specific design and application.

However, here are some general maintenance considerations for cast iron air valves:

Regular Inspection: Conduct routine visual inspections of the valve to check for any signs of damage, corrosion, or leakage. Inspect the valve body, seals, gaskets, and operating mechanisms for wear or deterioration.

Lubrication: Apply lubrication to the moving parts of the valve, such as the stem and disc, as per the manufacturer’s recommendations. Lubrication helps reduce friction, ensure smooth operation, and extend the valve’s service life.

Cleaning: Clean the valve periodically to remove any dirt, debris, or buildup that may hinder its performance. Use appropriate cleaning agents and methods recommended by the manufacturer to avoid damaging the valve or its components.

Testing: Test the functionality of the valve periodically to ensure it opens and closes properly. This can be done by operating the valve manually or using the appropriate actuation mechanism, depending on the valve type.

Sealing Inspection: Check the sealing surfaces of the valve, such as gaskets or O-rings, for any signs of wear, cracking, or degradation. Replace these components if necessary to maintain proper sealing and prevent leakage.

Pressure Testing: Depending on the application, consider conducting periodic pressure testing to check the valve’s integrity and ability to withstand the system pressure. This helps identify any potential leaks or weaknesses in the valve.

Corrosion Protection: Cast iron valves are susceptible to corrosion, especially in environments with high moisture or chemical exposure. Apply appropriate corrosion protection measures such as coatings, paints, or cathodic protection systems to prevent corrosion and extend the valve’s lifespan.

Valve Actuation System: If the cast iron air valve is equipped with an actuation system (e.g., electric or pneumatic actuator), inspect and maintain the actuation components according to the manufacturer’s guidelines. This may include checking for proper electrical connections, pneumatic pressure, or calibration.

Documentation and Record-Keeping: Maintain records of maintenance activities, including inspections, repairs, and replacements. This helps establish a maintenance history and assists in tracking the valve’s performance and lifespan.

Manufacturer’s Guidelines: Always refer to the manufacturer’s specific maintenance recommendations and guidelines for the particular cast iron air valve model being used. These guidelines may provide additional maintenance requirements or precautions specific to that valve.

It’s important to note that maintenance practices can vary based on the type of valve, the operating conditions, and industry-specific requirements. cast iron air valve Consulting the valve manufacturer or industry experts for guidance on maintenance procedures specific to your cast iron air valve is recommended.

What are the potential challenges or limitations of using cast iron air valves?

While cast iron air valves have several advantages, there are also some challenges and limitations associated with their use.

Here are some potential challenges or limitations of using cast iron air valves:

Corrosion: Cast iron is susceptible to corrosion, especially in environments with high moisture or chemical exposure. Without proper protection, the valve may corrode over time, leading to reduced performance and potential leakage.

Weight: Cast iron is relatively heavy compared to other materials used for valves. The weight of cast iron air valves can make installation and maintenance more challenging, especially in larger sizes or when working in confined spaces.

Limited Temperature Range: Cast iron air valves have temperature limitations. At high temperatures, cast iron may undergo thermal expansion, which can affect the valve’s performance and integrity. Extreme temperature variations can also lead to cracking or distortion of the valve body.

Brittle Nature: Cast iron is a relatively brittle material, meaning it is prone to cracking or fracturing under impact or stress. This brittleness can make the valve more susceptible to damage during handling or if subjected to sudden pressure changes.

Limited Chemical Compatibility: Cast iron may not be suitable for applications involving aggressive chemicals or corrosive media. Certain chemicals can react with cast iron, leading to accelerated corrosion or deterioration of the valve.

Lower Pressure Ratings: Compared to some other materials like steel or ductile iron, cast iron may have lower pressure ratings. This limitation may restrict the use of cast iron air valves in high-pressure systems.

Maintenance Requirements: Cast iron air valves may require regular maintenance, including inspections, cleaning, and corrosion protection, to ensure optimal performance and longevity. Neglecting maintenance can lead to reduced efficiency and potential valve failure.

Noise and Vibration: Cast iron air valves may generate noise and vibration during operation, especially if not properly installed or if the system experiences pressure fluctuations. This can be a concern in noise-sensitive environments or where excessive vibration can damage surrounding equipment.

Limited Design Options: Cast iron air valves may have limited design options compared to valves made from other materials. This limitation may affect the valve’s adaptability to specific system requirements or integration with other components.

Cost: While cast iron air valves can be cost-effective in certain applications, they may not always be the most economical choice, especially when compared to valves made from alternative materials such as plastics or lower-cost alloys.

It’s important to consider these challenges and limitations when selecting a valve material and to evaluate the specific requirements of the application to ensure the chosen valve meets the necessary criteria.

How does the shrinking process of PTFE tubing occur during heat application?

The shrinking process of PTFE (polytetrafluoroethylene) tubing occurs during heat application through a unique characteristic of the material. Unlike most other thermoplastics that soften and melt when heated, PTFE undergoes a phase change from a solid to a gel-like state before transitioning into a fully fused, non-melting form.

Here’s how the shrinking process of PTFE tubing occurs:

Activation Temperature: PTFE tubing has a relatively high activation temperature, typically above 327 degrees Celsius (621 degrees Fahrenheit). This activation temperature is required to initiate the shrinking process.

Gel State: When PTFE tubing is heated to its activation temperature, it undergoes a phase change and enters a gel-like state. In this state, the material becomes soft and pliable, allowing it to shrink and conform to the underlying surface.

Shrinkage: As heat is applied to the PTFE tubing, it contracts and shrinks radially, reducing its diameter. The degree of shrinkage depends on the shrink ratio specified for the particular heat shrink PTFE tubing.

Fusion: As the PTFE tubing continues to heat, it fuses together, forming a tight, seamless, and non-melting seal. This fusion process occurs due to the unique properties of PTFE, which allows the material to bond to itself without undergoing a true melting phase.

Cooling and Solidification: Once the desired shrinkage and fusion are achieved, the heat is removed, and the PTFE tubing cools down. During the cooling process, the material solidifies, maintaining its new shape and creating a durable, protective covering.

It’s important to note that the shrinking process of PTFE tubing requires careful control of the heat application to prevent overheating, which can lead to damage or degradation of the tubing. Proper techniques and tools, such as controlled heat guns or ovens, should be used to ensure precise and uniform shrinkage without exceeding the material’s limitations.

It’s recommended to follow the manufacturer’s instructions and guidelines for the specific heat shrink PTFE tubing being used to achieve optimal results during the shrinking process.

What are the considerations for installing and shrinking heat shrink PTFE tubing properly?

When installing and shrinking heat shrink PTFE tubing, there are several important considerations to ensure proper installation and optimal results.

Here are some key considerations:

Size Selection: Choose the appropriate size of heat shrink PTFE tubing for the application. Ensure that the tubing’s expanded diameter is slightly larger than the object or wire it will be covering to allow for proper shrinkage and a snug fit.

Cleanliness: Ensure that the surfaces to be covered by the heat shrink PTFE tubing are clean and free from dirt, dust, oils, or other contaminants. Any debris on the surface can affect the adhesion and quality of the shrinkage.

Preheating: Before applying heat, preheat the heat shrink PTFE tubing to remove any residual stress and minimize potential shrinkage variances. This can be done by briefly exposing the tubing to a low heat source.

Heat Source: Use a controlled heat source specifically designed for heat shrinking, such as a heat gun or oven. Adjust the heat source to the appropriate temperature specified by the manufacturer for the particular heat shrink PTFE tubing being used.

Heat Application: Apply heat evenly and continuously to the heat shrink PTFE tubing, moving the heat source in a sweeping motion to ensure uniform heating. Avoid focusing the heat on one spot for too long to prevent overheating or damaging the tubing.

Shrinkage Monitoring: Monitor the shrinkage process closely. The heat shrink PTFE tubing will gradually shrink and conform to the underlying surface. heat shrink ptfe tubing Ensure that the tubing has fully shrunk and tightly sealed around the object or wire before removing the heat source.

Cooling: Allow the heat shrink PTFE tubing to cool naturally after the shrinking process is complete. Avoid any abrupt cooling methods, as they may affect the integrity of the shrinkage or cause deformation.

Post-Installation Inspection: Inspect the installed heat shrink PTFE tubing to ensure that it is securely and uniformly in place, without any gaps, wrinkles, or irregularities. Verify that the tubing has achieved the desired level of protection and insulation.

It’s important to refer to the manufacturer’s instructions and guidelines specific to the heat shrink PTFE tubing being used, as different products may have unique requirements and recommendations for installation and shrinking. Following these considerations and the manufacturer’s guidelines will help ensure proper installation and maximize the performance of the heat shrink PTFE tubing.