Portable Axial Fans: Unleashing the Benefits of On-the-Go Air Circulation

Introduction

In various scenarios, from residential spaces to industrial settings, the need for portable and efficient air circulation solutions is paramount. Portable axial fans, with their compact design and powerful airflow, emerge as versatile tools that offer numerous benefits. In this article, we will explore the advantages of portable axial fans, highlighting their versatility, convenience, and ability to enhance airflow and comfort in a wide range of environments.

Understanding Portable Axial Fans

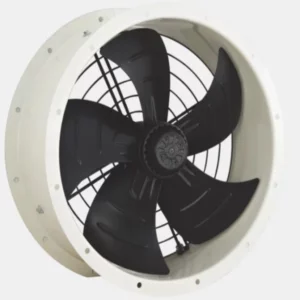
Portable axial fans are compact, lightweight devices that utilize axial flow technology to create airflow. They consist of a motor, a set of fan blades, and a housing. Unlike centrifugal fans, which generate airflow through centrifugal force, axial fans move air in a straight line parallel to the axis of rotation, making them ideal for applications that require efficient air circulation over a larger area.

Key Benefits of Portable Axial Fans

  1. Portability and Maneuverability:
    The primary advantage of portable axial fans is their ability to be easily moved and positioned wherever needed. These fans are designed with lightweight materials and often include handles or wheels for effortless transport. Their compact size allows them to fit in tight spaces, making them suitable for both indoor and outdoor use.
  2. Versatile Applications:
    Portable axial fans find utility in a variety of settings. They are commonly used in residential spaces, workshops, garages, construction sites, warehouses, and events. Whether it’s cooling a room, ventilating a confined area, or promoting air circulation in a specific location, these fans provide flexible solutions for numerous scenarios.
  3. Efficient Airflow and Ventilation:
    Portable axial fans are known for their ability to move large volumes of air efficiently. The axial flow design, with its straight-line airflow, allows for effective cooling and ventilation over a wider area. These fans are particularly useful in hot or stuffy environments, providing a refreshing breeze and maintaining a comfortable atmosphere.
  4. Temperature Regulation:
    In residential or commercial spaces without central air conditioning, portable axial fans serve as cost-effective alternatives for temperature regulation. By circulating air and promoting evaporation from the skin’s surface, these fans create a cooling sensation, helping individuals feel more comfortable in hot weather.
  5. Drying and Ventilation in Construction and Industrial Settings:
    Portable axial fans play a vital role in construction and industrial environments. They aid in drying wet surfaces, accelerating the drying process for freshly painted walls, concrete, or floors. These fans also assist in ventilation, removing fumes, smoke, or dust generated during construction or industrial processes.
  6. Noise Level Control:
    Portable axial fans are generally designed to operate quietly, making them suitable for use in noise-sensitive areas such as offices or bedrooms. Their low noise level ensures minimal disturbance while providing the desired airflow and ventilation.

Other Considerations

  1. Energy Efficiency:
    Portable axial fans are typically energy-efficient devices. Many models feature adjustable speed settings, allowing users to customize airflow based on their needs, thereby optimizing energy consumption.
  2. Ease of Use:
    These fans are designed for user convenience, often including intuitive controls and features such as oscillation or tilt adjustment. Some models may also offer additional functionalities like built-in timers or remote controls.

Conclusion

Portable axial fans offer a range of benefits,portable axial fan including portability, versatility, efficient airflow, and temperature regulation. With their compact size and maneuverability, these fans can be easily transported and positioned wherever necessary. Whether it’s cooling a room, promoting air circulation, aiding in drying processes, or assisting in ventilation, portable axial fans serve as convenient and effective tools in various environments. By harnessing the advantages of these fans, individuals can enhance comfort, improve air quality, and optimize airflow in a portable and efficient manner.

portable axial fan

What safety measures should be taken when working with pipe fitting elbows, particularly in high-pressure or critical applications?

Working with pipe fitting elbows, especially in high-pressure or critical applications, demands strict adherence to safety measures to prevent accidents, system failures, and ensure the well-being of workers. Here are important safety measures to consider:

  1. Personal Protective Equipment (PPE): Ensure that all personnel involved in the installation and maintenance of pipe fitting elbows wear appropriate PPE, including safety glasses, gloves, and protective clothing to safeguard against potential hazards such as sharp edges, hot surfaces, and chemicals.
  2. Pressure Ratings: Use pipe fitting elbows with pressure ratings that match the requirements of the specific application. Using fittings with lower pressure ratings in high-pressure systems can result in catastrophic failures. Check that the fittings are properly marked with their pressure ratings.
  3. Material Compatibility: Verify that the materials of the pipe fitting elbows are compatible with the fluids or gases being transported. Chemical compatibility is crucial to prevent corrosion, degradation, or contamination.
  4. Leak Detection: After installing or making modifications, conduct leak detection tests to check for any potential leaks. Look for bubbles forming at threaded connections, which indicate a leak. Address any leaks promptly.
  5. Proper Installation: Ensure that the fittings are correctly installed. Over-tightening can damage the threads, while under-tightening can result in leaks. Follow manufacturer guidelines for torque specifications and use thread sealants where necessary.
  6. Hydraulic Testing: In high-pressure applications, consider conducting a hydraulic test on the system to ensure that it can withstand the specified pressure without issues. Follow safety protocols during testing, and have a clear plan in case of system failure.
  7. Regular Inspection: Periodically inspect the system for signs of wear, corrosion, or damage. Address any issues promptly to prevent system failures.
  8. Emergency Response: Establish and communicate emergency response procedures for potential incidents, such as leaks or sudden pressure releases. Ensure that all workers are familiar with these procedures and that emergency equipment, such as eyewash stations and safety showers, are accessible.
  9. Isolation and Lockout/Tagout: Before working on the system, isolate it from other equipment and perform lockout/tagout procedures to ensure that no unexpected pressure or fluid release occurs during maintenance.
  10. Safety Regulations: Comply with industry and local safety regulations, as well as any specific requirements for the application. Follow established safety standards to ensure the protection of both personnel and the system.
  11. Qualified Personnel: In high-pressure or critical applications, consider using qualified and experienced personnel who are trained to work with such systems. Proper training and expertise are essential to avoid accidents.
  12. Documentation: Maintain detailed records of the installation, maintenance, and testing of pipe fitting elbows, as well as any modifications made to the system.

It is important to note that safety measures may vary based on the specific application, the type of fluid or gas being transported, and the pressure levels involved. pipe fittings elbow Always consult industry standards, safety guidelines, and the manufacturer’s recommendations when working with pipe fitting elbows in high-pressure or critical applications.

What is a pipe fitting elbow, and how does it function in plumbing and piping systems?

A pipe fitting elbow is a crucial plumbing component designed to facilitate changes in the direction of fluid or gas flow within a piping system. It functions by creating a bend or curve in the pipeline, redirecting the flow along a new path. Here’s a detailed explanation of what a pipe fitting elbow is and how it functions in plumbing and piping systems:

Pipe Fitting Elbow:

  • A pipe fitting elbow is a curved or bent pipe component with two female threads, one male and one female thread, or a combination of threads and plain ends. It is used to connect two sections of pipe while altering the direction of the pipeline, typically at a 90-degree or 45-degree angle. Elbows are available in various materials, including steel, copper, PVC, and more, to suit different applications.

Function in Plumbing and Piping Systems:

  • The primary function of a pipe fitting elbow is to change the direction of fluid or gas flow within a plumbing or piping system. It allows pipes to navigate around obstacles, fit into confined spaces, and create specific layouts in the system.
  • In plumbing systems, pipe fitting elbows are commonly used to reroute water, gas, or other fluids, enabling pipes to go through walls, floors, or ceilings while maintaining a consistent flow of materials.
  • These elbows are vital in industrial settings to direct the flow of chemicals, gases, or liquids to various processing equipment, ensuring efficient transport within a facility.
  • Pipe fitting elbows can be threaded onto the ends of pipes, creating a secure and leak-resistant connection. Properly installed elbows ensure the integrity of the system, maintaining fluid or gas flow without obstructions or interruptions.
  • The choice of a 90-degree or 45-degree elbow depends on the degree of change required in the direction of the pipeline. A 90-degree elbow creates a right angle turn, while a 45-degree elbow introduces a more gradual change in direction.
  • Additionally, pipe fitting elbows are instrumental in designing and configuring piping systems, allowing for optimized layouts and space utilization in plumbing, HVAC, and industrial applications.

In summary, a pipe fitting elbow is a plumbing component that changes the direction of fluid or gas flow by creating a bend or curve in the pipeline. Its function is essential for navigating complex layouts, reaching different levels of structures, and ensuring efficient transport of materials within plumbing, HVAC, and industrial systems. Properly installed pipe fitting elbows are crucial for maintaining system integrity and ensuring the efficient distribution of materials.

What are the maintenance requirements for cast iron air valves?

Maintenance requirements for cast iron air valves can vary depending on the specific design and application.

However, here are some general maintenance considerations for cast iron air valves:

Regular Inspection: Conduct routine visual inspections of the valve to check for any signs of damage, corrosion, or leakage. Inspect the valve body, seals, gaskets, and operating mechanisms for wear or deterioration.

Lubrication: Apply lubrication to the moving parts of the valve, such as the stem and disc, as per the manufacturer’s recommendations. Lubrication helps reduce friction, ensure smooth operation, and extend the valve’s service life.

Cleaning: Clean the valve periodically to remove any dirt, debris, or buildup that may hinder its performance. Use appropriate cleaning agents and methods recommended by the manufacturer to avoid damaging the valve or its components.

Testing: Test the functionality of the valve periodically to ensure it opens and closes properly. This can be done by operating the valve manually or using the appropriate actuation mechanism, depending on the valve type.

Sealing Inspection: Check the sealing surfaces of the valve, such as gaskets or O-rings, for any signs of wear, cracking, or degradation. Replace these components if necessary to maintain proper sealing and prevent leakage.

Pressure Testing: Depending on the application, consider conducting periodic pressure testing to check the valve’s integrity and ability to withstand the system pressure. This helps identify any potential leaks or weaknesses in the valve.

Corrosion Protection: Cast iron valves are susceptible to corrosion, especially in environments with high moisture or chemical exposure. Apply appropriate corrosion protection measures such as coatings, paints, or cathodic protection systems to prevent corrosion and extend the valve’s lifespan.

Valve Actuation System: If the cast iron air valve is equipped with an actuation system (e.g., electric or pneumatic actuator), inspect and maintain the actuation components according to the manufacturer’s guidelines. This may include checking for proper electrical connections, pneumatic pressure, or calibration.

Documentation and Record-Keeping: Maintain records of maintenance activities, including inspections, repairs, and replacements. This helps establish a maintenance history and assists in tracking the valve’s performance and lifespan.

Manufacturer’s Guidelines: Always refer to the manufacturer’s specific maintenance recommendations and guidelines for the particular cast iron air valve model being used. These guidelines may provide additional maintenance requirements or precautions specific to that valve.

It’s important to note that maintenance practices can vary based on the type of valve, the operating conditions, and industry-specific requirements. cast iron air valve Consulting the valve manufacturer or industry experts for guidance on maintenance procedures specific to your cast iron air valve is recommended.

What are the potential challenges or limitations of using cast iron air valves?

While cast iron air valves have several advantages, there are also some challenges and limitations associated with their use.

Here are some potential challenges or limitations of using cast iron air valves:

Corrosion: Cast iron is susceptible to corrosion, especially in environments with high moisture or chemical exposure. Without proper protection, the valve may corrode over time, leading to reduced performance and potential leakage.

Weight: Cast iron is relatively heavy compared to other materials used for valves. The weight of cast iron air valves can make installation and maintenance more challenging, especially in larger sizes or when working in confined spaces.

Limited Temperature Range: Cast iron air valves have temperature limitations. At high temperatures, cast iron may undergo thermal expansion, which can affect the valve’s performance and integrity. Extreme temperature variations can also lead to cracking or distortion of the valve body.

Brittle Nature: Cast iron is a relatively brittle material, meaning it is prone to cracking or fracturing under impact or stress. This brittleness can make the valve more susceptible to damage during handling or if subjected to sudden pressure changes.

Limited Chemical Compatibility: Cast iron may not be suitable for applications involving aggressive chemicals or corrosive media. Certain chemicals can react with cast iron, leading to accelerated corrosion or deterioration of the valve.

Lower Pressure Ratings: Compared to some other materials like steel or ductile iron, cast iron may have lower pressure ratings. This limitation may restrict the use of cast iron air valves in high-pressure systems.

Maintenance Requirements: Cast iron air valves may require regular maintenance, including inspections, cleaning, and corrosion protection, to ensure optimal performance and longevity. Neglecting maintenance can lead to reduced efficiency and potential valve failure.

Noise and Vibration: Cast iron air valves may generate noise and vibration during operation, especially if not properly installed or if the system experiences pressure fluctuations. This can be a concern in noise-sensitive environments or where excessive vibration can damage surrounding equipment.

Limited Design Options: Cast iron air valves may have limited design options compared to valves made from other materials. This limitation may affect the valve’s adaptability to specific system requirements or integration with other components.

Cost: While cast iron air valves can be cost-effective in certain applications, they may not always be the most economical choice, especially when compared to valves made from alternative materials such as plastics or lower-cost alloys.

It’s important to consider these challenges and limitations when selecting a valve material and to evaluate the specific requirements of the application to ensure the chosen valve meets the necessary criteria.

How does the shrinking process of PTFE tubing occur during heat application?

The shrinking process of PTFE (polytetrafluoroethylene) tubing occurs during heat application through a unique characteristic of the material. Unlike most other thermoplastics that soften and melt when heated, PTFE undergoes a phase change from a solid to a gel-like state before transitioning into a fully fused, non-melting form.

Here’s how the shrinking process of PTFE tubing occurs:

Activation Temperature: PTFE tubing has a relatively high activation temperature, typically above 327 degrees Celsius (621 degrees Fahrenheit). This activation temperature is required to initiate the shrinking process.

Gel State: When PTFE tubing is heated to its activation temperature, it undergoes a phase change and enters a gel-like state. In this state, the material becomes soft and pliable, allowing it to shrink and conform to the underlying surface.

Shrinkage: As heat is applied to the PTFE tubing, it contracts and shrinks radially, reducing its diameter. The degree of shrinkage depends on the shrink ratio specified for the particular heat shrink PTFE tubing.

Fusion: As the PTFE tubing continues to heat, it fuses together, forming a tight, seamless, and non-melting seal. This fusion process occurs due to the unique properties of PTFE, which allows the material to bond to itself without undergoing a true melting phase.

Cooling and Solidification: Once the desired shrinkage and fusion are achieved, the heat is removed, and the PTFE tubing cools down. During the cooling process, the material solidifies, maintaining its new shape and creating a durable, protective covering.

It’s important to note that the shrinking process of PTFE tubing requires careful control of the heat application to prevent overheating, which can lead to damage or degradation of the tubing. Proper techniques and tools, such as controlled heat guns or ovens, should be used to ensure precise and uniform shrinkage without exceeding the material’s limitations.

It’s recommended to follow the manufacturer’s instructions and guidelines for the specific heat shrink PTFE tubing being used to achieve optimal results during the shrinking process.

What are the considerations for installing and shrinking heat shrink PTFE tubing properly?

When installing and shrinking heat shrink PTFE tubing, there are several important considerations to ensure proper installation and optimal results.

Here are some key considerations:

Size Selection: Choose the appropriate size of heat shrink PTFE tubing for the application. Ensure that the tubing’s expanded diameter is slightly larger than the object or wire it will be covering to allow for proper shrinkage and a snug fit.

Cleanliness: Ensure that the surfaces to be covered by the heat shrink PTFE tubing are clean and free from dirt, dust, oils, or other contaminants. Any debris on the surface can affect the adhesion and quality of the shrinkage.

Preheating: Before applying heat, preheat the heat shrink PTFE tubing to remove any residual stress and minimize potential shrinkage variances. This can be done by briefly exposing the tubing to a low heat source.

Heat Source: Use a controlled heat source specifically designed for heat shrinking, such as a heat gun or oven. Adjust the heat source to the appropriate temperature specified by the manufacturer for the particular heat shrink PTFE tubing being used.

Heat Application: Apply heat evenly and continuously to the heat shrink PTFE tubing, moving the heat source in a sweeping motion to ensure uniform heating. Avoid focusing the heat on one spot for too long to prevent overheating or damaging the tubing.

Shrinkage Monitoring: Monitor the shrinkage process closely. The heat shrink PTFE tubing will gradually shrink and conform to the underlying surface. heat shrink ptfe tubing Ensure that the tubing has fully shrunk and tightly sealed around the object or wire before removing the heat source.

Cooling: Allow the heat shrink PTFE tubing to cool naturally after the shrinking process is complete. Avoid any abrupt cooling methods, as they may affect the integrity of the shrinkage or cause deformation.

Post-Installation Inspection: Inspect the installed heat shrink PTFE tubing to ensure that it is securely and uniformly in place, without any gaps, wrinkles, or irregularities. Verify that the tubing has achieved the desired level of protection and insulation.

It’s important to refer to the manufacturer’s instructions and guidelines specific to the heat shrink PTFE tubing being used, as different products may have unique requirements and recommendations for installation and shrinking. Following these considerations and the manufacturer’s guidelines will help ensure proper installation and maximize the performance of the heat shrink PTFE tubing.

What are the storage and handling precautions for petroleum ether?

When it comes to the storage and handling of petroleum ether, it is crucial to follow proper safety precautions to prevent accidents and ensure the well-being of individuals and the surrounding environment.

Here are some general storage and handling precautions for petroleum ether:

Storage Location: Store petroleum ether in a cool, well-ventilated area away from direct sunlight, heat sources, and ignition or flame sources.

Flammable Storage: Petroleum ether is highly flammable, so it should be stored in approved flammable liquid storage cabinets or containers specifically designed for flammable substances.

No Smoking: Prohibit smoking or open flames in the storage and handling areas to prevent ignition of vapors.

Electrical Equipment: Ensure that electrical equipment, including switches and lights, in the storage area is explosion-proof and meets the requirements for hazardous locations.

Grounding and Bonding: Ground and bond all containers and equipment used for transferring or handling petroleum ether to prevent the buildup of static electricity, which can potentially cause sparks and fires.

Adequate Ventilation: Maintain proper ventilation in the storage area to prevent the accumulation of flammable vapors. This can be achieved through natural ventilation or mechanical ventilation systems.

Personal Protective Equipment (PPE): Use appropriate PPE, such as gloves, safety goggles, and flame-resistant clothing, when handling petroleum ether to protect against skin contact, eye irritation, and potential fire hazards.

Handling Precautions: Handle petroleum ether with care to avoid spills or leaks. Use approved containers and equipment for transferring the solvent, and ensure proper sealing and closure of containers when not in use.

Fire Safety: Have suitable fire extinguishing equipment, such as fire extinguishers or fire suppression systems, readily available and ensure that personnel are trained in their use. Follow established fire safety protocols in case of a fire or emergency.

Regulatory Compliance: Familiarize yourself with local regulations and requirements regarding the storage and handling of petroleum ether. Adhere to any specific guidelines or permits that may be necessary.

It is important to note that the specific storage and handling precautions for petroleum ether may vary depending on local regulations, the concentration of the solvent, and the specific hazards associated with the product. Always consult the material safety data sheet (MSDS) or safety guidelines provided by the manufacturer for detailed and accurate information on proper storage and handling practices.

How does petroleum ether differ from other solvents?

Petroleum ether differs from other solvents in several ways, including its composition, boiling range, and specific applications.

Here are some key differences between petroleum ether and other solvents:

Composition: Petroleum ether is a mixture of hydrocarbons, primarily consisting of alkanes (paraffins). The specific composition can vary depending on the source and refining process. In contrast, other solvents may have different chemical compositions, such as alcohols (e.g., ethanol, isopropyl alcohol), ketones (e.g., acetone), or chlorinated solvents (e.g., dichloromethane).

Boiling Point Range: Petroleum ether has a relatively low boiling point range, typically between 30°C and 60°C (86°F and 140°F). This characteristic makes it suitable for applications that require rapid evaporation and quick drying. In comparison, other solvents may have higher boiling points, allowing for slower evaporation rates and longer drying times.

Flammability: Petroleum ether is highly flammable and poses fire and explosion hazards. It has a low flash point, which is the temperature at which it can emit vapors that can ignite in the presence of an ignition source. Other solvents may have varying degrees of flammability, with some being highly flammable and others having lower flammability risks.

Solvency Power: Petroleum ether is known for its solvency power, particularly for nonpolar substances such as oils, greases, waxes, and certain organic compounds. It is commonly used as a cleaning solvent, degreaser, China Petroleum Ether manufacturer or extraction solvent in various industries. In comparison, other solvents may have different solvency properties, making them more suitable for dissolving specific types of substances.

Safety Considerations: Due to its flammability, proper safety precautions must be taken when handling petroleum ether. This includes storing it in approved flammable liquid storage areas, using appropriate ventilation, avoiding ignition sources, and following safety guidelines. Other solvents may have different safety considerations, such as toxicity, corrosiveness, or environmental impacts, which need to be taken into account.

Regulatory Restrictions: The use and availability of petroleum ether may be subject to specific regulations and restrictions in certain jurisdictions due to its flammability and potential health hazards. Other solvents may also have specific regulations or limitations on their use based on their chemical properties and potential risks.

It is important to note that the selection of a solvent depends on the specific application, desired properties (e.g., volatility, solvency), safety considerations, and regulatory compliance. It is advisable to consult safety data sheets (SDS) and follow manufacturer recommendations when working with any solvent.

How does the sprocket interact with the other undercarriage components, such as track chains and rollers?

The sprocket is a crucial component of an excavator’s undercarriage system, and it interacts with other undercarriage components, including track chains and rollers, in the following ways:

Track Chains Engagement: The sprocket features teeth or projections that mesh with the track chain links. As the sprocket rotates, it engages with the track chains, causing the excavator to move. The sprocket’s teeth provide traction and transfer the driving force from the engine to the track chains, propelling the machine forward or backward.

Load Distribution: The sprocket helps distribute the weight and loads exerted on the undercarriage system. It transfers the weight of the excavator to the track chains and ultimately to the ground surface. The sprocket’s sturdy construction and design enable it to withstand the forces and torque generated during operation.

Alignment and Tracking: The sprocket, along with the idlers and rollers, plays a crucial role in maintaining proper track alignment. It guides the track chains and ensures they stay on the correct path, preventing derailment and excessive wear. The interaction between the sprocket and the track chains helps maintain the excavator’s stability and maneuverability.

Wear and Stress Distribution: The sprocket experiences wear due to continuous contact with the track chain links. However, it also helps distribute the wear and stresses evenly across the track chains and other undercarriage components. The sprocket’s design and tooth shape minimize concentrated wear points, reducing the risk of premature failure.

Lubrication and Friction Reduction: Proper lubrication between the sprocket teeth and the track chain links is essential to minimize friction and wear. CATERPILLAR CAT325 Excavator Undercarriage Part Sprocekt manufacturer The sprocket’s interaction with the track chains requires adequate lubrication to reduce heat generation and enhance the overall efficiency of the undercarriage system.

Tension Adjustment: The sprocket’s position and rotation affect the tension of the track chains. As the sprocket rotates, it causes the track chains to move and adjust their tension. Proper tensioning is crucial for optimal performance, as excessive or insufficient tension can lead to accelerated wear, reduced traction, and decreased undercarriage life.

Overall, the sprocket’s interaction with the track chains and rollers is a dynamic process that enables the excavator to move, provides traction, distributes loads, maintains alignment, and contributes to the overall durability and functionality of the undercarriage system.

How does the size and configuration of the sprocket teeth affect the machine’s performance?

The size and configuration of the sprocket teeth can have a significant impact on the performance of the machine.

Here are some ways in which the size and configuration of the sprocket teeth can affect performance:

Traction and Grip: The size and shape of the sprocket teeth directly influence the traction and grip of the excavator. Larger and more aggressive teeth tend to provide better traction, especially in challenging terrain conditions or when working on slopes. They can bite into the ground more effectively, preventing slippage and enhancing the machine’s overall performance.

Self-Cleaning Ability: Sprocket teeth with specific designs, such as self-cleaning or mud-shedding features, can prevent the accumulation of debris, mud, or rocks between the teeth and the track chains. This enhances the sprocket’s efficiency by maintaining proper engagement with the track chains and reducing the risk of debris-induced wear or damage.

Wear Resistance: The size, material, and hardness of the sprocket teeth impact their wear resistance. Larger and more robust teeth tend to have greater durability and can withstand higher loads and abrasive conditions without excessive wear. Hardened teeth or those made from wear-resistant materials can also prolong the sprocket’s lifespan, reducing the frequency of replacements and associated downtime.

Noise and Vibration: The size and configuration of the sprocket teeth can contribute to noise and vibration levels during machine operation. Teeth with specific profiles or designs can help reduce noise and vibration, providing a smoother and more comfortable operating experience for the operator.

Power Transmission: The size and shape of the sprocket teeth influence the power transmission efficiency from the engine to the track chains. Proper tooth configuration ensures effective power transfer, maximizing the machine’s performance and minimizing energy losses.

Speed and Torque: The size and tooth configuration of the sprocket can affect the speed and torque characteristics of the machine. Different tooth profiles and ratios can optimize the balance between speed and torque, allowing the excavator to operate efficiently in various applications and working conditions.

It is important to note that the selection of sprocket teeth size and configuration should align with the manufacturer’s recommendations and specifications for the specific machine model. Consideration should also be given to the intended application, terrain conditions, and the type of work the excavator will be performing to ensure optimal performance and longevity of the undercarriage system.

What are some common signs of corrosion in pipe nipple threaded one end?

Pipe nipple threaded one end is susceptible to corrosion, especially in environments with high moisture or corrosive substances. Here are some common signs that may indicate corrosion in a pipe nipple threaded on one end:

Discoloration:

Corrosion often causes a change in the color of the pipe nipple. Look for patches of discoloration, such as reddish-brown or greenish-blue spots. These can be early signs of corrosion.

Rust Stains:

One of the most apparent signs of corrosion is the presence of rust stains on the pipe nipple or surrounding surfaces. Rust occurs when iron or steel oxidizes in the presence of moisture and air. Look for reddish-brown stains or residue on the pipe.

Pitting:

Corrosion can cause small pits or depressions on the surface of the pipe nipple. These pits may appear as small, shallow craters or dimples. Pitting is a localized form of corrosion and can weaken the structural integrity of the pipe.

Flaking or Peeling:

As corrosion progresses, the outer layer of the pipe nipple may start to flake or peel off. This can result in thin sections or exposed metal, making the pipe more susceptible to further corrosion and potential leakage.

Thread Damage:

Corrosion can affect the threaded portion of the pipe nipple, making it difficult to install or remove fittings. Look for signs of thread damage, such as worn or distorted threads, or difficulty in turning or engaging the nipple into fittings or connectors.

Leakage:

In advanced stages of corrosion, the integrity of the pipe nipple may be compromised, resulting in leaks. If you observe any signs of water or fluid leakage around the threaded end of the pipe nipple, it may indicate corrosion-related damage.

Reduced Performance:

Corrosion can restrict the flow of water or fluids through the pipe nipple, leading to reduced performance or pressure loss in the system. If you notice a decrease in water flow or pressure, it could be due to corrosion-induced blockages or narrowing of the pipe’s internal diameter.

If you suspect corrosion in a pipe nipple threaded on one end, it is important to address the issue promptly. Depending on the severity of the corrosion, options for remediation may include cleaning, applying corrosion inhibitors, repairing or replacing the affected nipple, or implementing corrosion prevention measures such as protective coatings or cathodic protection systems.

Can track rollers be customized or modified to fit unique equipment or track systems?

Yes, track rollers can often be customized or modified to fit unique equipment or track systems. Manufacturers of track rollers understand that different applications and equipment may have specific requirements, so they may offer customization options.

Here are a few ways in which track rollers can be customized or modified:

Size and Dimensions: Track rollers can be customized to match the specific size and dimensions required for a particular equipment or track system. This includes variations in diameter, width, and overall dimensions to ensure proper fitment.

Mounting Options: The mounting configuration of track rollers can be modified to match the specific mounting points or brackets on the equipment or track system. This allows for seamless integration and installation.

Load Capacity: Depending on the application and load requirements, track rollers can be customized to have higher load-carrying capacities or be reinforced with additional materials to withstand heavy loads.

Sealing and Lubrication: Customization options may include different types of seals and lubrication systems to suit the environmental conditions or specific requirements of the equipment or track system. This ensures proper sealing and lubrication for optimal performance and longevity.

Material Selection: Track rollers can be customized with different materials or coatings for enhanced durability, corrosion resistance, or specific performance characteristics based on the operating conditions or requirements.

It’s important to consult with the manufacturer or a specialized supplier to discuss the customization options available for track rollers. They can provide guidance on the feasibility of customization and help determine the best solution to meet the unique needs of the equipment or track system.

How can proper lubrication extend the lifespan of a track roller?

Proper lubrication plays a crucial role in extending the lifespan of a track roller.

Here are some key ways in which proper lubrication contributes to the longevity and performance of a track roller:

Reduced Friction and Wear: Lubrication forms a protective layer between the moving parts of the track roller, minimizing friction and wear. track roller manufacturers It helps to prevent metal-to-metal contact and reduces the chances of premature wear, pitting, or damage to the roller’s surfaces.

Corrosion Prevention: Lubricants often contain additives that provide protection against corrosion. By applying lubrication to the track roller, it helps to prevent moisture from reaching the metal surfaces, reducing the risk of rust and corrosion.

Temperature Control: Proper lubrication helps to dissipate heat generated during the operation of the track roller. It prevents excessive heat buildup, which can lead to accelerated wear and potential damage to the roller.

Enhanced Sealing: Lubrication can improve the effectiveness of seals and prevent contaminants, such as dirt, dust, and debris, from entering the roller bearings. This helps to maintain a clean operating environment and reduces the risk of premature failure due to contamination.

Smooth Operation: Adequate lubrication ensures smooth and consistent movement of the track roller. It helps to maintain optimal rolling resistance, minimizing any jerking or uneven motion that can strain the roller or the entire track system.

To ensure proper lubrication, it is important to follow the manufacturer’s recommendations regarding the type of lubricant to use, the frequency of lubrication, and the application method. Regular inspections should be conducted to monitor the lubrication levels and condition of the track roller, and lubrication should be performed as recommended or when signs of inadequate lubrication are observed.

By implementing a proper lubrication regimen, the track roller can experience reduced friction, improved durability, and extended service life, ultimately contributing to the overall performance and reliability of the track system.

How does the remote control function of the hoist work and what are the available control options?

The remote control function of a small electric hoist allows the operator to control the lifting and lowering operations wirelessly, providing convenience and flexibility.

Here’s a general overview of how the remote control function works and the available control options:

Wireless Communication: The remote control is equipped with a transmitter that wirelessly communicates with the receiver unit on the hoist. small electric hoist with remote control This communication can be established through various technologies such as radio frequency (RF) or infrared (IR).

Transmitter Operation: The operator uses the buttons or switches on the remote control transmitter to send signals to the hoist. These signals correspond to specific commands, such as lifting, lowering, stopping, or changing the direction of the hoist’s movement.

Receiver Unit: The hoist’s receiver unit receives the signals from the remote control transmitter and translates them into commands that control the hoist’s motor and lifting mechanism. It may also include safety features and signal processing capabilities.

Control Options: The specific control options available on the remote control can vary depending on the hoist model and manufacturer. Common control options include:

Lifting and Lowering: Buttons or switches designated for lifting and lowering operations enable the operator to control the vertical movement of the hoist and the load.

Directional Control: Some remote controls offer directional control options, allowing the operator to move the hoist horizontally or change its direction of movement.

Speed Control: Certain models may include speed control features, enabling the operator to adjust the lifting or lowering speed of the hoist.

Emergency Stop: Many remote controls have an emergency stop button that instantly halts the hoist’s operation in case of an emergency or safety concern.

Range and Signal Strength: The range at which the remote control can effectively operate the hoist varies depending on the model and manufacturer. It is important to be within the specified range for reliable communication. Signal strength can sometimes be affected by obstacles or interference, so it is essential to maintain a clear line of sight between the remote control and the hoist.

It’s important to note that the specific features and control options of a remote control for a small electric hoist can differ between models and manufacturers. small electric hoist with remote control Therefore, it is advisable to refer to the user manual or contact the manufacturer for detailed information about the remote control functions and available options for a specific small electric hoist model.

What are some common safety precautions to follow when using a small electric hoist?

When using a small electric hoist, it is essential to prioritize safety to prevent accidents or injuries.

Here are some common safety precautions to follow:

Read the Manual: Familiarize yourself with the manufacturer’s instructions, safety guidelines, and warnings provided in the user manual. Understand the hoist’s limitations, operating procedures, and recommended maintenance practices.

Proper Training: Ensure that operators are adequately trained on how to operate the small electric hoist safely. They should understand the controls, safety features, and potential hazards associated with its use. Training should cover proper lifting techniques, load capacity limits, and emergency procedures.

Inspect the Hoist: Before each use, visually inspect the hoist for any signs of damage, wear, or malfunction. Check the cables, hooks, controls, and other components for any issues. Do not use a hoist that appears damaged or faulty.

Weight Capacity: Never exceed the maximum weight capacity specified by the manufacturer. Overloading the hoist can lead to equipment failure, accidents, and injuries. Take into account the weight of the load, including any attachments, and ensure it falls within the hoist’s rated capacity.

Secure Anchoring: Ensure that the hoist is securely anchored or attached to a stable structure capable of supporting the load. Use appropriate rigging techniques, such as proper slings or hooks, to secure the load to the hoist.

Clear the Area: Clear the area around the hoist of any obstructions or personnel. Maintain a safe distance from the hoist during operation to avoid being struck by the load or any moving parts.

Use Personal Protective Equipment (PPE): Wear appropriate PPE, such as safety gloves and protective eyewear, when operating the hoist. Additional PPE, such as a hard hat or steel-toed boots, may be required depending on the specific application and workplace regulations.

Control Operations: Use the remote control or control switches as intended. Familiarize yourself with the functions and operation of the controls. Avoid sudden or jerky movements that may cause instability or swinging of the load.

Avoid Side Pulling: Do not pull the load from the side or at an angle. Hoists are designed to lift loads vertically. Side pulling can cause the load to become unbalanced or tip over, leading to accidents.

Emergency Stop: Know the location and operation of the emergency stop button or switch. Be prepared to activate it in case of an emergency or unsafe situation.

Remember, these are general safety precautions, and it’s crucial to consult the specific safety guidelines provided by the manufacturer of the small electric hoist you are using. Adhering to proper safety practices will help ensure the safe and efficient operation of the hoist and minimize the risk of accidents or injuries.

A Comprehensive Review: baby diaper online sale Explained

A comprehensive review of baby diaper online sales would involve examining various aspects such as product selection, pricing, customer reviews, delivery options, and overall shopping experience. Since I don’t have access to specific real-time information or the ability to browse the internet, China baby diaper online sale manufacturer can provide you with a general overview of what to consider when exploring baby diaper online sales. Here are some key points to keep in mind:

Product Selection:

Look for online retailers or platforms that offer a wide range of baby diaper brands, sizes, and types (such as disposable or cloth diapers). A diverse selection allows you to choose the diapers that best meet your baby’s needs.

Pricing:

Compare prices across different online stores to ensure you’re getting a good deal. Keep in mind that discounts or bulk purchasing options may be available, so it’s worth checking for any ongoing promotions or sales.

Customer Reviews:

Read customer reviews and ratings for the diapers and the online store itself. This information can provide insights into the quality, performance, and overall satisfaction of both the products and the retailer.

Delivery Options:

Consider the delivery options available, including shipping costs, estimated delivery times, and any free shipping thresholds. Check if the online store ships to your location and if they offer tracking services for your order.

Return and Refund Policies:

Familiarize yourself with the return and refund policies of the online store. It’s important to know the procedures in case you receive a defective or unsatisfactory product.

Customer Service:

Assess the responsiveness and helpfulness of the online store’s customer service. Look for contact information, such as email addresses or phone numbers, that you can use to reach out with any inquiries or concerns.

User-Friendly Website:

A well-designed and user-friendly website can enhance your online shopping experience. Look for an intuitive interface, clear product descriptions, and easy navigation to find the diapers you need.

Trusted Brands and Authenticity:

Ensure that the online store sells authentic and reputable baby diaper brands. Check if the store has partnerships or collaborations with well-known manufacturers to ensure the diapers you purchase are genuine and meet quality standards.

Remember, it’s always recommended to make purchases from trusted and reputable online retailers to ensure a positive shopping experience and the quality of the products you receive. Conducting thorough research and reading customer reviews can help you make informed decisions when buying baby diapers online.